4 dTris Usage – Race Setup
4.1 Race Setup (F1)
Different options can be used to setup a race. When opening dTris, it is possible to select menu ‘File’ and choose between ‘New Race’ or ‘Open Race’
Pressing keyboard key ‘F1’ or clicking on the button ‘F1’ on the screen will propose the same options
4.1.1 Create a New Race
Press ‘F1’ or select menu ‘File’ > ‘New Race’
| Actions | Screenshots | |---------|-------------| | Press ‘F1’ or select menu
‘File’ > ‘New Race’ | | | Type the name of the race and click ‘Okay’ |
 | | Select the folder to save the race and click
‘Save’ button |
| | Select the folder to save the race and click
‘Save’ button | 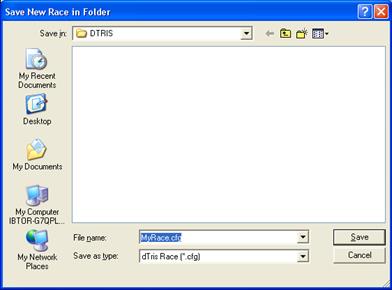 |
|
4.1.2 Open a race
Choosing option “Open Race” will open a dialog box to choose a dTris “cfg” file in the directory tree.
This allow dTris to open races which have been previously saved or prepared in advance.
4.2 Configure a race
After saving a new race, dTris displays a list of parameter to be set.The same list can be seen/modified when opening an existing race file, from dTris menu Configure Race > Edit Race Paramters.
4.2.1 Race Parameters
| Race Parameters | Comments / Default values |
|---|---|
| 2 start types : - Individual - Parallel [1] | |
| Intermediate Times / Speed Traps | If the race has speed traps or intermediate |
| times setup, click ‘Yes’ otherwise select ‘No’ – Default : ‘No’ | |
| Select the discipline of the race | |
| runs for the race | |
| specialised event | |
| each racer, displayed on the timing screen. | |
| course | Maximum time a racer is suppose to stay on course, will trigger an |
alert sound and switch the racer in ‘Red’ on the timing screen when this time is
passed. (help to detect DNFs) Default : 1:10.00 | | Minimum time a racer should
be on course | Minimum time a racer should be on course, will trigger an alert
sound and switch the racer in ‘Red’ on timing screen if the time of the racer is
less than what is defined here. (helps to detect False Finishes). Default :
0:45.00 | | Start Pulse Acceptance | Number of sec between 2 start pulses for
the second to be counted as a start. (help to limit # false start when starter
close the wand). dTris will ignore all start pulses which occurs during this
allowance immediately after the start valid start pulse Default : 5.00| | Finish
Pulse Acceptance | Time between Finish pulses for the next one to be counted as
a finish. (helps to limit false finish when a racer close finish line – body +
equipment). dTris will ignore pulses from the finish once a finish pulse has
been received. Default: .3 | | Interfacing with ACALive Manager (Live Timing) |
Allow the use of Live Timing thru ACALive. See paragraph
“ Some parameters like “Racers Start Method”, “Para
Event” and if a race is a dual “Dual Type” are not modifiable after clicking on
Okay on the “Parameter” screen. If any changes are required on those, a new race
will need to be created. Live Timing Setup” for further information. | | Number
of Categories | Set the number of categories. See paragraph “Categories Setup”
for further information. |
Some parameters like “Racers Start Method”, “Para
Event” and if a race is a dual “Dual Type” are not modifiable after clicking on
Okay on the “Parameter” screen. If any changes are required on those, a new race
will need to be created. Live Timing Setup” for further information. | | Number
of Categories | Set the number of categories. See paragraph “Categories Setup”
for further information. |
 Some parameters like “Racers Start Method”,
“Para Event” and if a race is a dual “Dual Type” are not modifiable after
clicking on Okay on the “Parameter” screen. If any changes are required on
those, a new race will need to be created.
Some parameters like “Racers Start Method”,
“Para Event” and if a race is a dual “Dual Type” are not modifiable after
clicking on Okay on the “Parameter” screen. If any changes are required on
those, a new race will need to be created.
4.2.2 Live Timing Setup
If live timing is required, during the setting of race parameters, you will be expected to feel-up the IP address of the computer where ACALive Manager in installed

As well as the CODEX of the race.
If LiveTiming is due to be use for a race, the
codex and set of information need to be sent to
rbeare@shaw.ca in order for the race to be prepared
on www.canskilive.com. This operation has to be
done at least a week prior to the race. Check ACASki Live Timing documentation.
4.2.3 Categories Setup
dTris allows 999 bib recorded per race. Races are often run with forerunners as well as racers. Forerunners should not appear in results and therefore cannot be timed in the same bib sets as racers.
Having multi categories will allow the timer to produce a set of results for each category.
In order to explain the category setup, lets take an example:
The race will have 98 racers
The bib #30 is missing in the bib set provided by the race organization.
During the race meeting, it has been defined that bibs will run in the following orders :
1 to 10, 95 to 99, 11 to 29 and 31 to 94
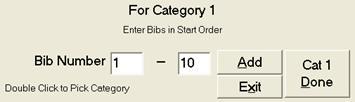
On the Category setup, enter :
| Enter the first set of bib: 1 to 10 Click on Add |
 | | Enter the second set of bib: 95 to 99 Click on
Add |
| | Enter the second set of bib: 95 to 99 Click on
Add |  | | Enter the third set of bibs: 11 to 29
Click on Add |
| | Enter the third set of bibs: 11 to 29
Click on Add |  | | Enter the fourth set of bibs:31
to 94 Click on Add |
| | Enter the fourth set of bibs:31
to 94 Click on Add |  | | Click on Cat 1 Done when
all bibs are in | |
| | Click on Cat 1 Done when
all bibs are in | |
When the category is set, setting needs to be done for padding and forerunners.
4.2.3.1 Category padding
dTris is working on unique bib#. In other words, only one bib#2 can exist in the same race. In case there are 2 categories (one for racers, one for forerunners and bib#1 to #5 appears in both categories, the forerunners category needs to be padded).
dTris allows a pad to be subtracted from the bib# to obtain the second set of bibs where numbers are in the same range as the other set.
For one category, the pad will be set to 0 (bib#1 minus Pad = Bib#1)
For the other category, the pad can be set to 400 (bib#401 minus Pad = Bib#1)
 The entire category is padded; it is not
possible to pad only one bib# among all in a single category.
The entire category is padded; it is not
possible to pad only one bib# among all in a single category.
The PAD is setup after the category is set, when dTris operator click on “Cat X Done”
Is the category padded ?
Click on “Yes”

Enter the pad# (ex. 400)

4.2.3.2 Forerunner category
After clicking on “Cat X Done”, and after choosing the PAD#, the category need to be defined as Forerunner category or not.
When a category is set as Forerunners, bibs raced under this category will not appear on the display device.
If the category is to be the forerunner set of racers
Click “Yes”

Confirm the Forerunner category
Click “Yes” to confirm
Click “No” to return to the previous question
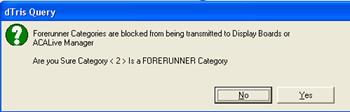
Note : When a category is listed as “forerunner” any results from this category will not be visible neither on the display board, neither on Live Timing if Live Timing is setup for the race.
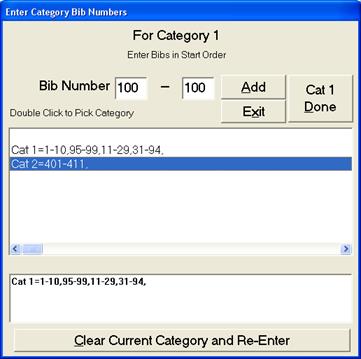
4.2.3.3 Reset a category
If a mistake was done in setting-up a category, the category can be cleared and reset from the Configuration screen :
Select Menu Configure Race > Edit Race Parameters

Select the field “Enter Number of Categories Required (Forerunners, Racers)”
Click “Okay”
This will bring category setup screen back

Double click on the category to reset
Click on “Clear Current Category and Re-Enter”
 Note : the category to clear is the one listed in
the field highlighted in red in this screen shot (in our example : Cat 1)
Note : the category to clear is the one listed in
the field highlighted in red in this screen shot (in our example : Cat 1)
4.3 Device setup (F2)
In order for dTris to time the race and display results on display board, each device need to be set and tested, this would ensure the timer and the display board are well plugged into the computer and accordingly set according to their specification into dTris.
This menu can be access using either :
- Depressing “F2” key on the keyboard - Clicking on “F2” button on dTrain main screen - Using menu “Configure Race > Choose Devices”
4.3.1 Choose Timer
From the dTris main screen, depress F2 key or click on ‘F2’ button.
This will display “Choose Devices”
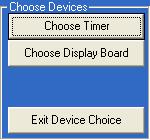
Click on “Choose Timer”
Click on the name/connection port of your device
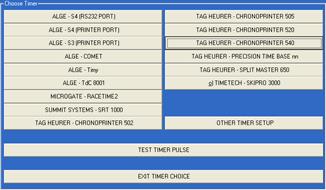
Choosing the device will lead to a question asking which port is used for this device
Click on “EXIT TIMER CHOICE” when all pulses have been tested thru “TEST TIMER PULSE”
It is important to test the timer using the
TEST TIMER IMPULSE button and test ALL impulses: Start, Speed, Intervals and
Finish. This will also helps finding which Channel each impulse is connected to
(this information is used to configure the timer (F3)
4.3.2 Choose Display Board
From the dTris main screen, depress F2 key or click on ‘F2’ button.
This will display “Choose Devices”
Click on “Choose Display Board”
Select the display board according to what is used for the race
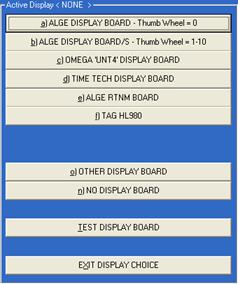
Choosing the device will lead to a question asking which port is used for this device

If required for the device, a request will be done for the BAUD rate set on the device

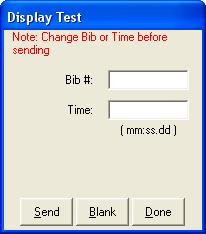
Check the display board is working as expecting by clicking on “TEST DISPLAY BOARD”
Insert a number in field BIB#
Insert a dummy time such as 00:36.10 in Time field
Click on “Send” to display on the board
Click on “Blank” to clear fields
Click on “Done” when you have confirmed the display is working as expected
4.4 Timer configuration (F3)
When a timer is selected in dTris (refer to “Choose Timer” on previous paragraph), “Config Timer” button becomes available.
“Config Timer” is accessible using the following options :
- Depressing “F3” key from dTris main screen - Clicking on menu “Config Timer F3” on the dTris main screen - Using menu “Configure Race > Config Timer”
4.4.1 Channels configuration
The configuration of each impulse channels is done in this screen
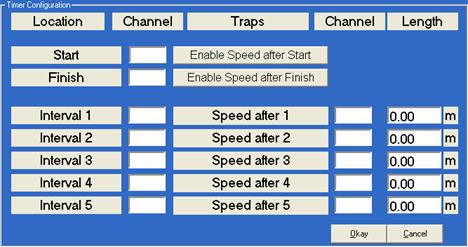
For each timing device on the hill, dTris requires the channel identification. This will allow dTris to assign each pulse to the correct location on the hill for each racer.
When the race includes speed traps, make sure to fill-up the speed channel for each speed location as well as the distance between the initial location and the speed trap location.
Channel to be used for each timing location
can be seen from the Timer Testing screen, refer to paragraph “4.3.1” page “11”
using “Test Timer Pulse” button
Note : When channel fields are left empty, it means no timing location is set for this point.
4.4.2 Push Start
When a push start is set, it means you have a timing location few meters below the start wand.
After setting the channel for the start wand, click on “Enable Speed after Start” and type the channel used for the speed timing location as well as the distance between this timing location and the start wand.
4.5 Load Racers file (F4)
This function allow Racers Names to be loaded from 3 file format : Measures, Special Olympics and GMS and Other Ascii files.
Whichever option is chosen, the category to whom the file need to be loaded need to be specified.
Bibs setup in the Racer Name file should match bibs set for the category
Each file should contain bib for one and only one category.
4.5.1 Measures File Format
4.5.2 Special Olympics GMS File Format {style="margin-left:0cm;text-indent:0cm"}
4.5.3 Other Ascii File Formats {style="margin-left:0cm;text-indent:0cm"}
In this option, you will have 2 choices :
o Fix length fields
The file should have BIB#, Racer Name and Club columns, you must know positions and length of each field
o Comma Separated
The file should have 3 columns ( Bib#, Racer Name and Club), you must know in which column each field is located
4.6 Synchronizing dTris Time (F5) {style="margin-left:0cm;text-indent:0cm"}
To allow dTris to enter in race mode, another action need to be executed : Sync Time
Sync Time simply reads a record from the timer and sets the programs clock to the value received.
This synchronization can be accessed using 3 different methods :
- Depress keyboard key “F5”
- Click on button “F5 Sync Timer” on dTris main screen
- Select menu “Configure Race > Sync Timer”
Note : it is recommended to sync all timing devices used on the hill prior to sync dTris.
To synchronize, a set of questions will need to be completed
Questions
Possible Answers
Information
Is TIMER Connected and running in TIME OF DAY
Yes / No
No - return to dTris main screen without doing any synchronization
Yes– Allow dTris to pursue with synchronization process****
Print Synchronizer Pulse to a Printer
Yes / No / Cancel
Yes – will print the sync pulse when it appears on the selected printer
No – Display Synchronizer window
Cancel - return to dTris main screen without doing any synchronization
Indicate which Printer to use
Select printer listed
Displays only if previous question was answered with “YES”
Please transmit Timer Pulse < Port#>
ESC
It is a good practice to ask the starter to open the wand to get this pulse
Place this Synchronization into another file
Yes / No
This is used if the same sync time is to be used in 2 different race files.
Yes – to copy the sync time to another dTris Race file.
No – return to dTris main screen
It is always possible to comeback to this menu and resync if necessary, the restriction in such case is it has to be done outside of the Timing race screen which means you will have to pause the race to do a re-sync.
When pulse is received from the timer, dTris will turned from :
 to
to 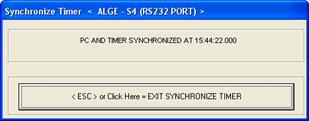
And the time will start running on top of dTris screen :

4.6.1.1 Exit Sync Time
To exit the “Sync Time” window, depress key “ESC” on the keyboard or click on
“
Synchronisation time can be saved in another dTris file if required to be used for a second race.
 Synchronizing dTris and TIMER enable button
“Time Race F9”.
Synchronizing dTris and TIMER enable button
“Time Race F9”.
4.7 Show Cats (F6)
Show category menu is only presented to ensure categories are set according to race plan. Check them before entering in Race Mode. If it is not accurate, return to Race Parameters and reset categories according to Race requirements.
To modify categories, refer to paragraph “Categories Setup” page 8.
5 Timing a race
When the race is set in dTris (F1, F2, F3, F4 are completed), and the synchronization between dTris and Timer is done (F5), it is possible to enter in Timing mode
To open the timing screen, either depress key “F9” on the keyboard or click on button “Time Race F9” on dTris main screen.
5.1 Setup Runs
5.1.1 Setup Run #1
The first time the timing screen is opened on a race file, dTris will trigger the creation of a New Run#1.
Questions
Button available
Descriptions
Start a New Run #1
No/Yes/Cancel
No– Try to open previous run, as in this case (Run1) previous run is not existant, it will return to dTris main screen.
Yes – Pursue the setup of Run#1
Cancel – Return to dTris main screen
Invert entire ‘RUN #’ race start order
Yes/No
Yes- This will set the racer starting list in reverse order for all categories. If the category #1 was set from bib#1 to bib#55, the first racer displayed to leave the start get will be bib#55 followed by bib#54 ... until bib#1
No– Will list the racers in the start gate in the order defined during the creation of the category
Activity to log File output
Both / Log Only / Cancel
Both – All pulses and calculation are sent to the printer as well as to the log file
Log Only – Will create a log for each timing pulse and time calculation, but nothing is printed – mostly used when no printer can be attached to the computer
Cancel – Return to dTris main screen
5.1.2 Setup Run#2
To setup a new run when Run#1 has been completed and DSQs registered, dTris operator needs to setup the RUN#2 start list according to what the race requirement are. The tab and Schemas below will help to define which answers need to be provided in dTris to obtain the right RUN2 start list :
Run2 Start List :
RUN2 Setup #
Description
1
CATEGORY 1 'RUN 2' has 'RUN 1' FINISH ORDER with X RACERS REVERSED
CATEGORY 2 'RUN 2' has 'RUN 1' FINISH ORDER with X RACERS REVERSED
2
CATEGORY 1 'RUN 2' has 'RUN 1' FINISH ORDER with X RACERS REVERSED
CATEGORY 2 'RUN 2' has 'RUN 1' FINISH ORDER with Y RACERS REVERSED
3
CATEGORY 1 'RUN 2' has 'RUN 1' START ORDER
CATEGORY 2 'RUN 2' has 'RUN 1' START ORDER
4
CATEGORY 1 'RUN 2' has 'RUN 1' START ORDER INVERTED
CATEGORY 2 'RUN 2' has 'RUN 1' START ORDER INVERTED
5
CATEGORY 1 'RUN 2' has 'RUN 1' START ORDER
CATEGORY 2 'RUN 2' has 'RUN 1' START ORDER INVERTED
6
CATEGORY 1 'RUN 2' has 'RUN 1' START ORDER INVERTED
CATEGORY 2 'RUN 2' has 'RUN 1' START ORDER
7
CATEGORY 1 'RUN 2' has 'RUN 1' FINISH ORDER with X RACERS REVERSED
CATEGORY 2 'RUN 2' has 'RUN 1' FINISH ORDER with X RACERS REVERSED
8
CATEGORY 1 'RUN 2' has 'RUN 1' FINISH ORDER with X RACERS REVERSED
CATEGORY 2 'RUN 2' has 'RUN 1' START ORDER INVERTED
9
CATEGORY 1 'RUN 2' has 'RUN 1' FINISH ORDER with X RACERS REVERSED
CATEGORY 2 'RUN 2' has 'RUN 1' START ORDER
10
CATEGORY 1 'RUN 2' has 'RUN 1' START ORDER
CATEGORY 2 'RUN 2' has 'RUN 1' FINISH ORDER with X RACERS REVERSED
11
CATEGORY 1 'RUN 2' has 'RUN 1' START ORDER INVERTED
CATEGORY 2 'RUN 2' has 'RUN 1' FINISH ORDER with X RACERS REVERSED
To setup RUN2, from dTris Main screen, press “F9” to get into the Timing Screen. Find how to obtain the RUN2 setup# according to your choice, look for it in the next 2 schemas and find out how to answer questions.